


As we know, recent months have seen an increase in the number of people working from home. Formal conferences have moved to the internet, and many tools, such as Zoom, Microsoft Teams, are being used for business purposes. To be able to participate in video conferences, you must have a webcam. Installing an external webcam enables you to use your computer’s built-in one or its web camera. Well, webcam troubleshooting error 0xA00F4289 appears in the Windows 10 Camera app and prevents you from using Skype and other video conferencing apps.
In this guide, I’ll show you how to fix this webcam troubleshooting error quickly.
Fix Webcam Error 0xA00F4289 on PC
Because the webcam may be loose, your computer may not detect the camera. If you are using an external webcam, attach it to the computer properly. When using a tripod, gently press everything surrounding the camera, including the camera body’s sides.
And, if you have a built-in webcam, gently touch the underside of your laptop lid to activate it. If you apply light pressure around the webcam, then the error code 0xA00F4289 should disappear.
Update your drivers
If your camera has stopped working or if you’re using the latest webcam drivers, make sure that you’re running the latest version.
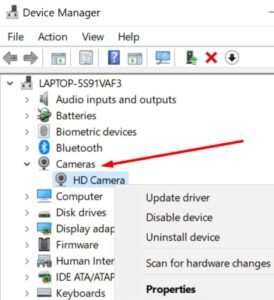
To update your drivers:
1. In the Device Manager, locate and expand the listing for cameras click on “your webcam” instead of “using your microphone.”
2. If the problem has been corrected, select the driver and click “Check if your driver is up to date.”
3. If driver updates were unsuccessful, then try reinstalling it. No further action is needed; you only need to select the Uninstall.
4. Let your computer automatically reinstall the latest webcam drivers restart for you.

Check your privacy settings
There are a few other possible reasons why your webcam will not be detected by error 0xA00F4289.
1. Select your privacy.
2. Under App permissions, tap on Camera (on the left side pane).
3. Scroll down to Allow apps to use your camera & toggle on this option.
4. Make sure this setting is enabled.
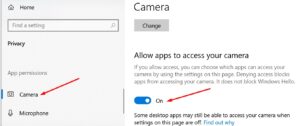

Use your computer to see if the webcam is now operational.
Run the Hardware & Devices Troubleshooter
The next step is to run the Hardware & Devices Troubleshooter.
1. Use the “admin” option in the right-click menu in the context menu to launch the appropriate administrative Command Prompt.
2. Enter the msdt.exe -id DeviceDiagnostic command and press Enter.
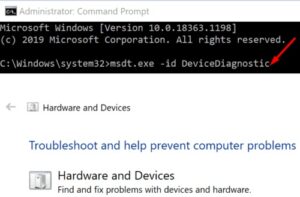

3. The Hardware and Devices window will pop-up; click on Next to launch the scan.
4. Restart your computer and test your webcam.
Restart the Windows Camera Frame Server Service
If the Windows Camera Server is running as it should, your webcam will need to be installed and enabled.
Finding the correct solution may be as simple as restarting the service.
To find a box on the taskbar at the bottom of the Start menu to locate and activate them.
And follow the step-by-by-step instructions in the User documentation.
1. Look down to find the Windows Camera Frame Server Service.
2. Right-select the service settings and choose “Automatic (Home)” from the resulting menu.


ALSO SEE: Fix WhatsApp Not Downloading Media
Make the following changes:
Besides, right-click on the service, and select “Refresh.”


You may now use your webcam.
If you are having problems with the problematic video conference app, then uninstall it.
Uninstall the problematic video conference app
if the webcam troubleshooting error 0xA00F4289 affects only one program, select ‘Uninstall a program’ in the Programs and Features’ tab, go to ‘Programs’ then remove the malfunctioning program.”


Start your computer again and reinstall that software. Verify if the issue resolves by reinstalling the tool.
Dear Readers, let us know in the below comments section if you could successfully resolve or fix the webcam troubleshooting error.