


According to software expert, 0xc1900101 error or bug occurs with the BSOD, which is quite irritating and painful. In this article, you’ll learn some practical ways to settle down this error. If we talk about installing or Updating Windows 10, many issues you could experience. In many cases, the system displays an error message that could help you figure out the problem. This post might help while updating & installing the Windows 10 operating system. Windows 10 Installation bug comes with the error message is:
Couldn’t update to Windows 10, Sorry we couldn’t complete the update to Windows.
We’ve restored your previous version of Windows to this PC.
Here’s a series of Windows 10 Installation Error that frequently pop-ups while installing the Windows 10 –
0xC1900101 – 0x3000D
0xC1900101 – 0x20004
0xC1900101 – 0x30018
0xC1900101 – 0x4000D
0xC1900101 – 0x2000c
0xC1900101 – 0x20017
0xC1900101 – 0x40017
Fix: Windows 10 Installation Error 0xC1900101
To Fix the Windows 10 Installation Error 0xC1900101, follow the simple steps:
1} Disconnect All External Devices
Sometimes, the problem related to the Windows 10 Installation Error 0xC1900101 probably occurs because of the connected multiple peripheral devices to your PC. For example – Microphone, digital camera, printer, speaker, etc. Once the operating system tries to figure out the drivers for each of them, it gets stuck. Although the drivers of external devices sometimes may not be compatible with the operating system.
Accordingly, to fix this issue, we recommend you to unplug all non-essential external devices. Afterward, restart your PC and check if the error 0xC1900101 is persisting there.
2} Free up Hard Drive Space to fix the 0xC1900101 error
Sometimes, you probably experience the Windows 10 Installation Error 0xC1900101 issue while updating your system. It is one of the most common issues that is being encountered or facing by Windows users. To upgrade a 32-bit Operating system, you should have at least 16 GB of free space or room in your hard drive. Whereas, to upgrade a 64-bit operating system, your system needs a minimal of 20 GB of space.
Besides this, the minimum room must be available in your C drive so that the Windows could download the updates straight in the required folder. And if you don’t find a way to get the drive’s space, you can quickly free up your hard drive using the Disk Cleanup method. Here’s how to do it –
1. Tap on the Start button and type cleanmgr in the text field.
2. Now select the Disk Cleanup option from the list.
3. After that, choose the C: drive and then tap on the OK button.
4. At this moment, your device will begin checking the temporary & needlessly files.
5. Next, tap the “Clean up system file” button.
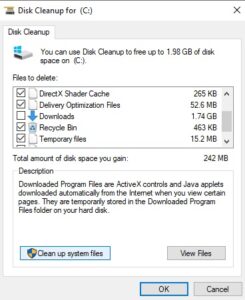

6. Select the C: drive again, then press the OK button.
7. Mark all the check-boxes and press OK to delete these data.
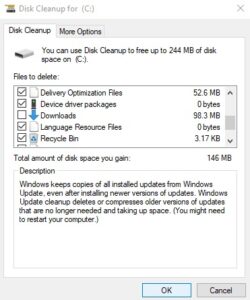

8. When it completes the process, restart your system to remove any leftovers.
3} Run Windows Update Troubleshooter
If there’s something wrong with your hardware, it can result in the Error 0xc1900101 on your screen. In that case, you can run Windows Update Troubleshooter to check whether the issue exists due to your hardware. Here’s how to do it –
1. Tap on the Start button and select the Settings icon, available in the left sidebar.
2. Select the Update and Security category to continue.
3. Now from the left pane, select the Troubleshoot option and then move to the right pane.
4. Select the Windows Update feature and then tap on the Run the troubleshooter button.
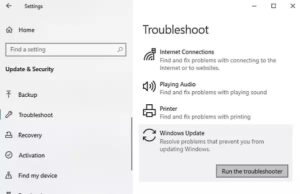

5. Afterward, wait for a while until the device detects the problems.
6. If any issue is found with the hardware, it’ll be displayed when the scanning process gets completed.
7. So, at this time, all you have to select the problems and fix them.
However, if it does not encounter such problems, then it may not be a hardware issue. In this case, you have to move to the next workaround.
4} Use Windows Device Manager to 0xC1900101 error
Microsoft recommends always keep all the system drivers updated. It would be pretty useful for third-party accessories that are installed on your Windows. Besides, it is the network driver or graphics driver available on your PC. If you’re unable to find the update through Windows, then you need to check with the OEM website and, after that, update it. To update it, follow the below easy steps –
1. Right-tap on the Start button and choose Device Manager from the list.
2. Now in the Device Manager window, find the driver you’ve to update. There’s usually a yellow exclamation sign before the defined category so that you can quickly identify these drivers from the list.
3. Afterward, from the drivers’ list, expand each hardware section, and view for any issue.
4. When you find the driver, right-tap on it and choose the Properties option.
5. In the wizard, move to the Driver tab and choose the Update Driver option.
6. On the next page, tap on “Search automatically for updated driver software.”
7. That’s all. Windows will automatically identify, download, & install the driver.
When you complete the above procedure, restart your device & check if the 0xC1900101 error persists. If this method does not resolve it, then try the next one.
5} Remove third-party security software
Anti-Virus & the Security related solutions are generally known as the savior of the computer device as it helps protect them against malware & security breaches. Although, it becomes notorious and vulnerable when it appears to perform any high-level alterations in the Windows Update.
In this case, you are required to disable such apps, including Windows Defender. Additionally, you can keep them away from your device until the update problems get fixed.
6} Run Disk Checking Utility via Command Prompt
Windows Update sometimes fails because of the appearance of issues in the hard drive. In this case, you required to run an elevated command prompt & execute the run chkdsk command line. That way, you can free Windows from the nagging issues. Here’s how to do it –
1. Tap on the Start button and type cmd.
2. Now select Command Prompt from the list and then do a right-tap on it.
3. From the context menu, choose Run as administrator.
4. If UAC prompts on the screen, tap on the Yes button.
5. Afterward, in the elevated Command Prompt, type the following given command line.
chkdsk C: /f /r /x
C – It indicates the Disk where the OS is installed. You can change this to E:, D:, or any other, relying upon your usage.
f – stands for fixing the scanned bugs or errors.
r – implies detecting the existing issues in the Disk.
x – indicates splitting up the disk volume to assist the detection process.
6. Hit the Enter key; the Disk Checking Utility starts looking for bad sectors.
7. It’ll take a while; thus, wait until this gets over.
8. At last, restart your device, so the changes come into effect.
7} Perform a Clean Boot to install the Windows Updates
In case none of the above workarounds work for 0xC1900101 error, then you can start your system into Clean Boot State. In this state, you are required to run Windows Update and check whether it works. However, there is an excellent possibility that it could work. It helps you stay connected with the internet to download and install the updates with minimal conflict issue.