


Realtek High Definition Audio Driver is the most commonly used sound driver to manage the Windows system’s sound settings. Realtek HD Audio Manager comes packed along with the Realtek Audio driver. It is the most commonly used sound driver loaded with unique features & supports a six-channel Digital to Analog Converter (DAC) along with 16.20.24-bit Pulse Code Modulation in channel audio 5.1. In this post, we’ll talk about How to Reinstall Realtek HD Audio Manager in Windows. Let’s begin!
This sound driver also eases the sound control play on the Windows desktop and is well-known to give a high-quality sound to your system via the audio card. Additionally, it is tagged with your audio device to increase the sound experience. Recently, Windows users have also reported the problem in accessing the sound driver. The users have even had the Realtek HD Audio Manager icon being lost or gone astray from the taskbar, system tray, & notification section. The issue probably triggered either after the Windows update or because of a change in the audio card driver.
Reinstall Realtek HD Audio Manager | Realtek HD audio manager
Before downloading the new drivers, you need to uninstall all the current drivers. To stops or prevent duplicate conflicts among various drivers, one must uninstall the duplicate audio drivers.
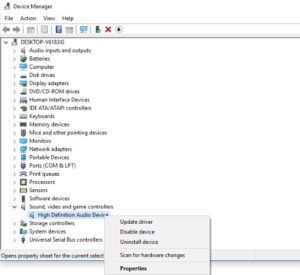
1. Tap Windows + X and select Device Manager to open Device Manager in Windows 10.
2. Expand the Sound, video, & game controllers in the list. Right-tap Realtek High Definition Audio, then click Uninstall device.
3. Afterward, click Delete the driver software for this device option and press the Uninstall button.
4. Then you can tap the Action tab and tap Scan for hardware changes. Windows will automatically scan & download the Realtek HD Audio driver and then reinstall the Realtek HD Audio Manager software.

And to manually download the audio driver, Navigate to the official site of Realtek here – realtek.com/en/downloads. Tap on High Definition Audio Codecs (Software). Now the download page will list the available audio drivers for download. Please search for the one that you want and then download it.
When the downloading process is complete, double-tap on the setup files and then follow the installation instructions.
And if you still find the component missing or in case you have trouble opening it, then follow these suggestions despite reinstalling the Realtek HD Audio.
Resolve Realtek HD Audio Manager issues
1) Turn off Microsoft UAA Bus Driver for HD Audio & fix driver conflicts
In the Device Manager, you need to expand the System Devices.
- Search and then locate Microsoft UAA Bus Driver for High Definition Audio.
- Right-tap on it and click Disable from the drop-down.
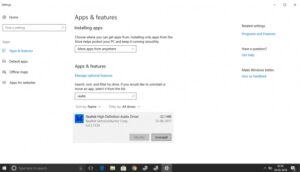
- Open Windows Settings and head to Apps & Features
- Now tap on Realtek High Definition Audio Driver and tap the option with Uninstall the driver.
- Then navigate to Device Manager and right-tap on the disabled Microsoft driver.
- Click on Uninstall from the drop-down menu.
- When you do this, now reinstall the Realtek HD Audio Driver.

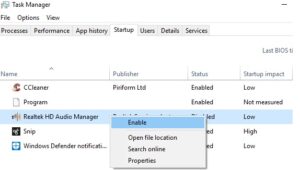
2) Enable the startup in Task Manager
You can also turn on Realtek HD Audio Manager on startup from Task Manager.
- Head to Start and then open the Task Manager.
- Then navigate to the Startup tab.
- Search and then locate the Realtek HD Audio Manager.
If the status is turned off, right-tap on it and click on the Enable option from the drop-down menu.
- Now restart the system.

3) Update the Sound driver software
You can even download the newest version of the Realtek HD Audio Manager by updating the sound driver.
- Open the Device Manager.
- Expand Sound, video, and also game controllers.
- Right-click on Realtek High Definition Audio and tap on Update driver from the drop-down menu.
- Assume that you have the latest driver setup file on your computer, select Browse my computer for driver software.
- Choose and then select Let me pick from a list of available drivers on my computer.
- Search & pick the latest driver by date and then tap Next to update.
4) Add Legacy hardware | Realtek HD audio manager
- Go to the Device Manager.
- Search and tap on the Sound, video, and game controllers.
- Tap on the Action tab.
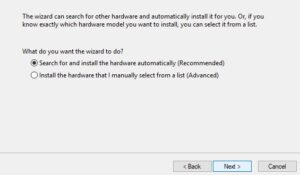

- Search and press on Add legacy hardware from the drop-down menu.
Now click on the Next button, then select the radio button for Search and install the hardware automatically (Recommended).
- Press on Next and manually install the driver again.
Conclusion
I sincerely hope you guys like this Realtek HD audio manager article and find it helpful. Please give us your feedback on it also if you have further queries related to this post. Then let us know in the below comments section. We will get back to you shortly.