

While you can project Computer Screen to the TV by using Miracast, you’ll be surprised at how effortless and straightforward it is to Cast Videos & Movies playing on your computer to the TV by using Chromecast.
So, in this article, you’ll find below the simple steps to Chromecast Setup on Windows 10 Computer.
What is Needed to Chromecast Setup On Windows 10 PC
Google Chromecast is a straightforward device to setup and use on any device, including Mac, iPad, iPhone, Android Phones & Tablets. So, to Setup on PC, you’ll be requiring the following.
1. Google Chromecast Device
2. Windows 10 Computer
3. Google Chrome Browser Installed on your Computer
When you’re ready with all these items, follow the easy steps below first to plug the Chromecast device into
your Home TV after that setup Chromecast on your Windows 10 PC.
Chromecast Setup on Windows 10 Computer
Follow the simple steps below:
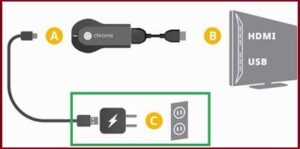
1. Firstly, plug in the HDMI end of the Google Chromecast device into the HDMI port of your Home TV, then plug the USB end into the USB power adapter.

2. Afterward, use the Remote Control of your TV to change your TV’s Source input to the right HDMI port in which the Chromecast device is plugged.
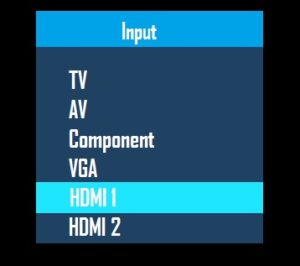

On most Remote Controls, you’ll be required to press the “Input” or “Source” button & continue pressing the “Input” or “Source” button until the TV display changes from “HDMI 1” to “HDMI 2.”
You’re done now with Setting up the device on your TV. Besides, the next step is to Chromecast Setup on your Windows 10 Computer by following the following steps as listed below.
3. Visit google.com/chrome to download & install the Google Chrome browser on your computer if you’re not already using the Chrome browser.
4. After that, open the Chrome browser on your PC & visit chromecast.com/setup.
5. On the Chrome Setup screen, tap on Set Up Your Chromecast using this Computer link.


6. On the next screen, Agree to Chromecast Privacy Terms by tapping on the Accept button.
7. When you accept the terms, the webpage will begins searching for available Chromecast devices connected to your Wi-Fi Network.


Necessary: If your Computer can’t Find the Chromecast device, try switching over the Wi-Fi Network on PC from 2.4 to 5 GHz and vice versa.
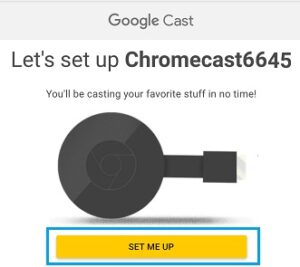
8. Afterward, on the next screen, tap on the Set Me Up button.

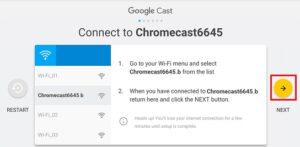
9. Next, tap on the Wi-Fi icon located at the right corner of the taskbar on your computer and then tap on Chromecast’s open Wi-Fi Network.
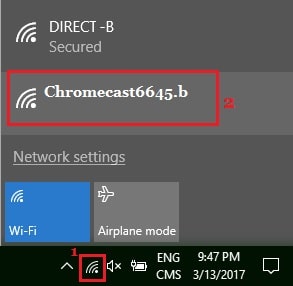

10. After connecting to Chromecast’s open Wi-Fi network, tap on the Next button.

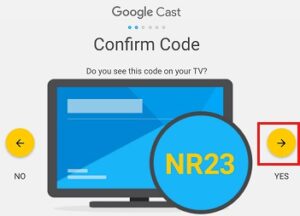
11. On the next screen, tap on the Yes Arrow if the Code appearing on your Windows computer screen matches the Code appearing on the bottom right corner of your TV.

12. On the next screen, you’ll be asked to provide a Name for your Chromecast. Now, type any name that you would like to use, then click on Looks good.
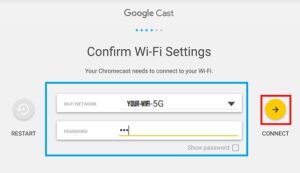
13. After that, to confirm your Wi-Fi Settings. Choose your Wi-Fi Network, Enter the password for your Wi-Fi network and tap on Connect.

14. Chromecast will display, Ready to Cast! Screen.
So, when you see the Ready to Cast screen, you’re all setup & ready to Cast anything playing on the Windows 10 Computer screen onto the large screen of your Home TV.
How to Cast Movies, Videos From Computer to TV
Follow the simple steps below to Cast a Video or Movie playing on a Windows 10 Computer onto the giant screen of your Home TV.
1. Firstly, open the Chrome Browser on your Windows 10 Computer.
2. Now, find the Video or Movie on YouTube, Netflix or other Chrome Compatible sites that you wish to watch on the big screen of your Home TV.
3. Afterward, as the Video Starts Playing on your Computer, tap on the Cast Icon located at the upper right corner of your Computer.


4. You’ll immediately see the Video or Movie playing on the screen of your TV.
Dear Visitor, that’s all about Chromecast setup on a Windows 10 computer; So lets us know about your experience in the comments section below!