


As we know that earlier, when you received photos on Gmail, it was effortless and straightforward to move them to Google Photos. One would save them to Google Drive. Afterward, they would show up in Google Photos as they were linked. But, currently, Google unliked Google Photos & Drive. That also affected the way how folks moved photos from an email to Google Photos.
If you get numerous pictures on Gmail that you would want to appear in your Google Photos, things are different now. Although there’s no direct way to move them to Google Photos, don’t worry, various alternatives exist.
So without further ado, let’s check how to quickly move photos from email, mainly from Gmail to Google Photos.
How to Transfer Images from Gmail to Google Photos on Web
There are two best ways to do that. Each has its advantages & disadvantages. Let’s take a glance.
1. Move Photos to Google Photos By Using Google Drive
The primary method takes the help of Google Drive using the built-in feature in Google Photos. You’ve to upload the photos to Drive from Gmail first; after that, add them to Google Photos using the native Drive option.
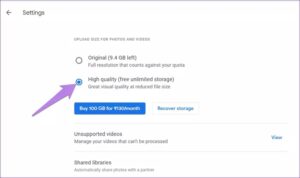
We know Google Photos allows us to upload unlimited photos, provided the upload size is set to high-quality in Google Photos settings. Well, check the quality before adding the photos from Drive. When they are added, delete the images from Drive to free up Google storage.

Here are the simple steps in detail:
Note: This method merely works with Gmail.
Step 1: Firstly, open the email from which you wish to move photos to Google Photos.
Step 2: Tap on the Save to Drive icon next to the photos. All the images will be automatically added to the root folder of Google Drive. If you wish to move selected photos only, tap on the Drive icon on the photos itself.


Important: At this point, photos will take up the storage space on Google Drive.
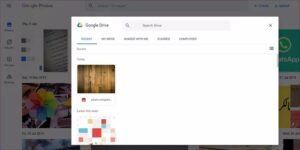
Step 3: Now open photos.google.com and tap on Upload.


Step 4: Tap on Google Drive from the menu.


Step 5: Choose the photos to upload to Google Photos. The photos will now appear at the date on which they were taken & not at the top.

Step 6: Afterward, open drive.google.com and delete the photos if you need to free up Google storage space. And deleting them on Drive will not remove them from Google Photos.
2. Transfer Photos to Google Photos by Downloading
The downside of the previous method is, it only works for Gmail. And for other emails, including Gmail, you can use the usual procedure to download all photos on your PC & then add them manually to Google Photos.
Here are the simple steps in detail:
Step 1: At first, open the email containing the photos.
Step 2: Tap on Download all attachments to download all images. A ZIP file will now be downloaded on your computer. You can also download individual photos by tapping on the download icon.
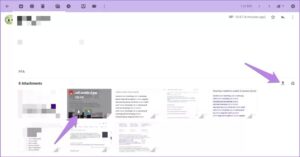
Important: Extract the ZIP file to add the images to Google Photos.
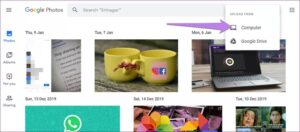
Step 3: Now, open photos.google.com. Tap on Upload and choose Computer. After that, navigate to the extracted or downloaded photos that you wish to add.

How to Upload Images from Email to Google Photos on Mobile
Let’s check out separately for Android & iPhone.
Move Images from Email to Google Photos on Android
There are 2 simple ways to do so.
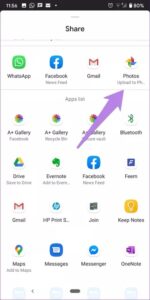
1. Move Photos By Using Share Icon
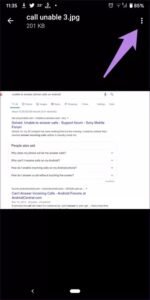
Step 1: Firstly, open the email containing the photos.
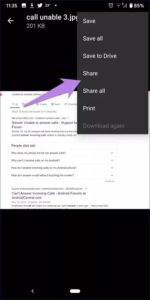
Step 2: Click on the photo and hit the three-dot icon at the top. Choose Share from the menu. In some apps, you’ll find the Share all option. Use it to save all images in the email straight to Google Photos.

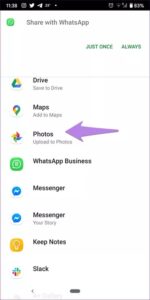
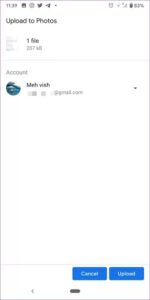
Step 3: Now, choose Google Photos. Then, select the Google account and click on Upload.
2. Add Photos by Downloading Them
Suppose you have multiple photos, and your email app or website does not support sharing all photos to Google Photos. In that case, you can download them individually on your mobile and then upload them together.
In case backup for Google, Photos is enabled for the Downloads folder on your mobile, then downloading them will add them automatically to Google Photos. However, if you do not use the backup feature of Google Photos on your mobile, you’ll have to add them manually.
Here are the simple steps:
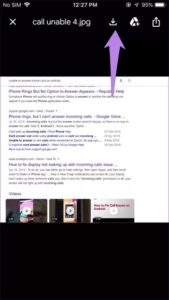
Step 1: Open the email. Now look for the download button of the photos. You might have to open the images and click on the three-dot icon.
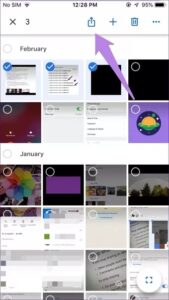
Step 2: When all the photos are downloaded, open the gallery app of your mobile. Select the photos and click on the share icon. Select Google Photos.

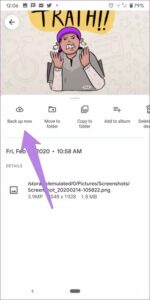
If you use Google Photos as your gallery app, launch the Google Photos app. Click on Albums, then navigate to the folder containing the downloaded images. Now open the photo. Swipe up and choose Back up.

Upload Images from Email to Google Photos on iPhone
Step 1: Launch the email app, then go to the required email.
Step 2: Open the photo and click on the download icon at the top.

Step 3: When you have downloaded all the photos, open the Google Photos app. Choose the photos and click on the backup icon.
Why Use Google Photos Rather Than Google Drive
If you’re wondering, is it not better to save the photos on Google Drive only? Well, you can. But as you’re aware, images saved in Google Drive count against your Google storage quota. That’s not the situation with Google Photos if photos are added in high-quality. Additionally, viewing & sharing photos is easier on Google Photos as compared to Drive. So it is better to use Google Photos. I hope Google offers a native button in Gmail to add photos to Google Photos.